Search This Blog

Wednesday 31 October 2012

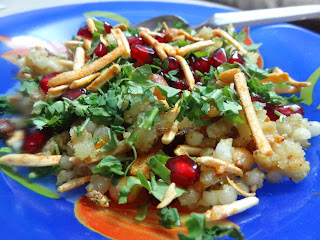
Sabudana Khichdi with Farari Chiwda


Farari Sabudana Khichdi is very famous near Ambe Mata Mandir here in Vapi.  The street vendor specifically sells farari snacks there. What a great idea to start ferari snack lari near a temple.


Last time when I tried Sabudana Khichdi, one of my frined Abhay told me about this khichdi however I did not try it soon. Mom happened to bring parcel of this khichdi  from that vendor and she became fan of it. She was very excited to try it herself at home.

It’s a splendid combination on sweet (pomegranate seeds), sour (put ample of lemon juice) and chatpatta chiwda. You are left with delicious taste on your taste buds.

Preparation time: 10 minutes
Making time: 15 minutes
Serves: 4

What goes in it:

Sabudana (Sago) - 1 cup
Water- 1 cup
Potato, boiled and diced- 1 cup
Peanuts, grinded- ½ cup
Cumin seeds (Jeera) - ½ tbl spn
Asafoetida (Hing)- ¼ tbl spn
Curry leaves- 1 sprig or 5-6 leaves
Oil- 2 tbl spn
Green Chilli, finely chopped- 1 tbl spn
Lemon juice- 6-7 tbl spn (adjust as per you taste)
Sugar- 1 ½ tbl spn
Aamchur powder- 1 tbl spn
Garam Masala- 1 tbl spn
Salt- as per your taste
Coriander leaves, finely chopped- ½ cup
Pomegranate seeds- 2 cup
Ferari Chiwda- 3 cup (Mom bought this chiwda from that street vendor but it can be easily available from any grocery store)

How did I make it:

Soak sabudana in water for about 4-5 hours in a flat bottomed vessel. Soak in water just enough to soak cover top of sabudana.


[Foodies’ Note: Be careful while soaking sabudana in water. If you use more water then sabudana will become sticky.]

Once they turn soft and fine round shaped, they are ready to be cooked.

Meanwhile, wash and peel off potato. Boil them. Drain off the water and cut it into small cubes. Keep it aside.

Grind peanuts in a grinder.


Mix the coarse peanut powder with sabudana properly.


Take a kadai and prepare for tempering. Pour oil in it and heat it. As it heats up, put jeera and hing. As jeera crackles, put curry leaves and chopped green chillies to it. Sauté for about 1-2 minutes.

Next put boiled potato, sugar, ample of lemon juice and salt. Mix them all and let it cook for 1-2 minutes.  


Finally add sabudana to it. And season generously till all the ingredients are properly mixed.


Take it off the stove.

Now transfer it to wide plate where you can easily mix the ingredients. Add pomegranate seed, chiwda and a pinch of aamchur and garam masala.


 Mix them all well.


Garnish with coriander leaves and pomegranate seed.


Serve it before the chiwda gets soft.

Monday 29 October 2012

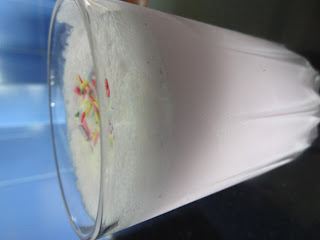
Black Currant Milkshake


I never try any other flavour in milk except Bournvita. Since it wasn’t available at home, I was wondering what I drink now??? In refrigerator had 2 option- Mapro’s Strawberry crush and Black Currant crush syrup. Strawberry is my least favourite syrup so tried on Back Currant milkshake...


Making time: 5 minutes
Serves: 2 glasses

What goes in it:
Milk- 2 glass
Black Currant syrup- 3 tbl spoon (I used Mapro’s Black Currant crush)
Vanilla ice cream- 3 scoop

To make it look yummy:
Chocolate sprinklers- ¼ cup

How did I make it:

Pour a glass of milk in a deep cooking pot.


You may add sugar if you want to but I did not put sugar as the syrup and ice cream is already sweet.

Then add ample of vanilla ice cream to it.


Pour down about 3 tbl spn of black currant syrup.


Churn the milk using a blender.  Pour it in a glass.

Garnish it by adding little ice cream and top it off with chocolate sprinklers. Ready to drink this yummy cold black currant milkshake especially in summers.


Sunday 28 October 2012

Paneer Bhurji with Capsicum


This is a variation to the Paneer Bhurji I had cooked earlier. This suggestion was given to me by my friend- Vinita. Recently had made Russian Salad so there was supply of red and yellow bell pepper at home.  This recipe looks more tempting then the earlier one. Both the paneer bhurji tastes equally good but this one has become my favourite. Bell Pepper gives a nice blended spicy taste to the paneer.


Preparation time: 10 minutes
Cooking time: 7 minutes approx

What goes in it:

Cottage cheese (Paneer), minced: 250 gm
Asafoetida (Hing)- ½ tbl spn
Green Chilli, finely chopped- 4-5 chillies
Ginger, finely chopped- ½ piece
Garlic, finely chopped- 5-6 cloves
Onion, finely chopped- 1
Tomato, finely chopped- 1
Red Bell Pepper (Red Capsicum), finely chopped- ½  
Yellow Bell Pepper (Yellow Capsicum), finely chopped- ½  
Oil- 2 tbl spn
Turmeric powder- ½ tbl spn
Coriander –Cumin powder- 1 tbl spn
Salt to taste

How did I make it:

Cut tomato and onions in a mixture and get partially chopped tomato and onion. Grind green chilli, garlic & ginger to form a paste.  Finely chop red and yellow bell pepper into small squares.

Mince paneer. This can be done very easily with hands.

Take a kadai, pour oil in it. As oil heats up, put hing to it. Saute chilli-garlic-ginger paste for about 1 minute. 

Now add onion, tomato and cook till onion turn light brown. Add both the bell pepper. Add salt, turmeric powder, coriander- cumin powder & red chilli powder. Let it cook for 2 minutes. 


Finally add minced paneer to it. Season generously. Let it cook for 2 minutes.


Add chopped coriander leaves to it and mix it well.


It was served with garma garm Naan


Saturday 27 October 2012

Ice Cream Sandwich


Last week Daddy bought sandwich ice cream from the ice cream shop downstairs. It was soft and yummy. I thought to try out this simple recipe at home using Bour Bon biscuit and vanilla ice cream.


It is super quick recipe and you can just grab your mouthful with it. Kids are going to love this ice cream sandwich. Also if you add on your creativity to it, it can turn out to be an unusual dessert for your guests.

You can try it with any of the combinations like your favourite ice cream, chocolate sauce, chocolate sprinklers and biscuits.

Preparation time: 5 minutes
Making time: 10 minutes
Serves- 6 sandwich ice cream
What goes in it:

Vanilla ice cream- 1 cup
Bour Bon biscuit- 1 small packet

How did I make it:


Twist open the biscuit and lay them on the plate such that you can put ice cream on the cream layered biscuit.


Using a small spoon, put ample of vanilla ice cream on the biscuit. Level it properly from the edges.


[Foodies’ Note: Don’t be too slow at this point because you would not want your ice cream to melt.]

Put second layer of the biscuit on the ice cream and press a bit gently.


You can grab it right there and then. Or refrigerate it for few hours and then eat this yummy biscuit sandwich ice cream.

I personally liked after freezing. I refrigerated it for 6 hours. You will feel the delicious cool vanilla-chocolaty taste.

Try and experiment with different biscuits. Oreo biscuits will also be a tempting combination with vanilla ice cream... 

Monday 22 October 2012

Russian Salad


I was in Mumbai last week and my friend Vinita had invited me for lunch at her home. She made yummy cuisine with south Indian flavour to the food. I simply loved the way she served variety of food to me. I learnt a lot over that lunch like garnishing the plate, using different bell pepper for different food recipes. I also learnt a couple of recipe to cook and try out myself. Welt this Russian Salad in one among them.


It simple, quick and delicious. You can play around with your favourite veggie or fruit and prepare this salad at home to give a different taste to your regular salad. It takes less than 20 minutes to make it.

Making time: 10 minutes
Serves: for 4 people

What goes in it:
Red bell pepper, chopped- ½ medium sized
Onion, chopped- 1 small sized
Carrot, chopped- 1 small sized
Coriander leaves, chopped- ½ cup
Salt- as per your taste
Red chilli powder- ¼ tbl spn
Sugar- ½ tbl spn
Mayonnaise- 1.5 cup (I used Heinz eggless Mayonnaise, I almost used half of it)

How did I make it:

Cut red bell pepper or red capsicum, carrot and onion into small pieces. You can also add peas and pineapple. I did not use peas as my sister is not very fond of peas and pineapple was not available at home. Vinita had also added cottage cheese or paneer to it. You can experiment with different veggie combinations as per your likes or dislikes.


Now take a bowl. Put diced vegetables to it. Add salt, red chilli powder and sugar to it. Pour mayonnaise to it. Mix them all well.

[Foodies’ Note: Put very little salt as mayonnaise has salt in it. So just sprinkle salt for taste.]


Add coriander leaves to it and mix it well.


Refrigerate the salad for about 1 hour. Take it out 10-15 minutes before serving.

Sunday 21 October 2012

Masala Potato Chips


Last week had made potato finger chips, I was telling about it to my friend Bhavika. She told me this gravy recipe cooked from tomato and garlic which will be a yummy add on to the normal finger chips. It sounded tempting and quick to cook. So I had to try it out soon. 


Here goes simple and easy to make masala chips recipe...

What goes in it:

Potato, long finger shaped- 4 big sized

Salt- ¼ cup
Oil- sufficient to deep fry
Garlic, chopped- 9-10 cloves
Tomato, puree- 2 medium sized
Ajwain- ½ tbl spn
Cumin seeds, jeera- ½ tbl spn
Red chiili powder- ½ tbl spn
Coriander leaves, finely chopped- ½ cup

How did I make it:

First make potato finger chips which I posted earlier but make this one more crisp. 
Just a quick recap-
Peel potatoes. Cut them into long finger shaped slices. Wash them off and drain the water properly. Take kadai, put oil in it. Heat it and prepare for frying the cut potatoes. Put cut potatoes in kadai for frying. Fry till they turn crisp and golden brown. When cooked, put it on absorbent paper to soak extra oil. Keep it aside.


Now lets make gravy.

Chop garlic into small pieces.


Cut tomato into four and make puree in mixture grinder.

Take a frying pan and put oil in it. Prepare oil for tempering. As oil heats up, sauté jeera and ajwain till they pop properly. Now add chopped garlic to it and shallow fry it till they turn golden brown.  

Add tomato puree to it. Put red chilli powder and salt to it. Add ample of coriander leaves. Mix them all well and cook for about 2 minutes.


Transfer it to a bowl.


Just before eating, coat potato chips with this tomato-garlic gravy. Serve masala chips in a plate.


Monday 15 October 2012

Rasgulla


I never thought I would be cooking rasgulla myself at home when until recently I was at my uncle’s place for lunch. Any meal is incomplete without a sweet; yummy rasgulla completed the perfect Gujju meal. It was then and there, I was tempted to cook rasgulla myself at home.


I browsed through various rasgulla recipes on internet. And came across this simple recipe for making rasgulla on sharmis passion blog.

I cooked it once but was not successful as they cracked while cooking in sugar syrup. Second time I again tried cooking it with a little change in the ingredients. This time I added cornflour as binding agent and a little sugar while rounding paneer balls. And Yipeee I was successful making round and soft rasgulla.

Cooking time: 40 minutes
Makes: 12-14 nos

What goes in it:

Milk- ½ ltr
Lemon juice- 1 ½ tbl spn
Sugar- ½ cup
Water- 1 ½ cup
Cornflour- ½ tbl spn
Cardamom powder- ¼ tbl spn (infact less than that, a pinch)
Ice cubes- 4 to 5 nos

How did I make it:

Take milk in a cooking pot. Switch on the gas on high flame and boil milk. As milk boils, add lemon drops one by one. Keep on stirring the milk as you add lemon drops.

As you will stir continuously, milk will slowly curdle up.


As milk curdles up, switch off the gas stove.  Add 4 to 5 ice cubes and let them melt completely. Drain off the whey water using a strainer or channi.


Tie this curdled milk in a cloth. Hang it for 30-40 minutes.


[Foodies’ Note: After half hour when you open up the colth. It will be paneer (cottage cheese).]

After hanging it for sufficient time squeeze in the extra water. Open up the cloth and put it in a plate.


Crumble the paneer. Add cornflour to it. Cornflour will act as a binding agent so rasgulla does not break when you cook it in sugar syrup or chasni.


Knead the paneer with cornflour properly for about 10-15 minutes till you get smooth pliable dough. More properly you knead the paneer, softer the rasgulla will be.

Make 10-12 small balls out of it. While making balls put very little sugar (less than a pinch) in it and make round balls. Keep it aside. See to it there are no cracks while you round the balls.


In a heavy bottomed vessel, put water and sugar. And heat them till it boils. Sprinkle a pinch of cardamom powder for flavour. As the sugar syrup boils, slowly add balls one by one to it.


Cook rasgulla on medium flame keeping it covered for 10 minutes. As you will see, the rasgulla will grow in size. The rasgullas are then done and let it cool.


After sometime transfer to a small container and refrigerate it.  Take out of refrigerator after 1 or 2 hours and Rasgulla is ready to be served.